Rabu, 21 Maret 2007

Dust Free Computer

Most of just forget to clean our internal computer. One buys a computer and left it on a corner till it get dusty, dirty and oily. Even for gamers they just leave it rather then cleaning it, but for some just cleaning the outside is just to make the PC look new. Computers were designed to exhaust chip-damaging heat generated by the Power Supply unit, VGA Cards and CPU’s. Fans and vents, which were clogged with dust, will lead to overheating, erratic PC behavior, noisy computer, and even complete malfunction of the computer.

Computer Screen.
LCD Cleaner
Your LCD or CRT screen is probably with touch-print or worse yesterday’s pizza on it.
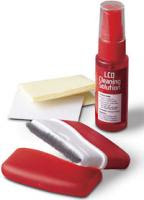
Use a commercial LCD screens cleaner that comes in a spray bottle and includes a special cloth for all my LCD monitors, LCD TVs, and laptop screens.

Follow these steps to safely clean your Computer Screen :-
a. Wipe the dust off the monitor with a soft, lint-free cloth.
b. Dampen a sponge or lint-free cloth with water. (Be sure to rinse out all the excess moisture.)
c. Rub the screen's surface gently. (Careful: Don't get any excess liquid on or inside the monitor.)
d. Let the monitor dry completely before closing the lid!
To help prevent the stains, consider storing the soft lint-free cloth that you use to clean the monitor inside the laptop, between the keyboard and screen.

Avoid using detergent that contains strong chemicals (acid or alkaline). Don't use abrasive powders.


Put a Shine on your mouse.

Use the same technique with your mouse, which you should clean on all sides. Mouse pick up a lot of gunk on their undersides, so just scrape off anything that's accumulated there. If you’re still using a non-optical mouse that uses a ball, open it up, clean off the ball with the damp towel, and use a Q-Tip to clean off the rollers inside. Alcohol works for rollers that are excessively dirty.


Dust Inside Computer.

CPU
You use compressed air from a local hardware shop would do the trick. Dust-Off is a good brand, try getting a environment free compress air. Open up your PC's casing and take it outside if there's an excessive amount of dust. Give it a few quick blasts from the can with the goal of getting all the dust out of the CPU. Extended spraying is a no-no, as the air that comes out is quite cold and can cause condensation to build up on electronic parts if you hold down the spray button for too long. Use the nozzle straw attachment to get to hard-to-reach places like under the motherboard, CPU and small fans.


Clean your keyboards.

Use the straw attachment to clean out your keyboard and also a small brush. You could also use a mini-vacuum. Next you'll want to clean off the surface of the keyboard. Most are pretty tough, so you can use a regular household cleanser to do the job.

Don't spray 409 directly onto the keyboard, but lightly dampen a cleaning rag or paper towel with the 409 and wipe it down gently. You don't want liquid dripping between the keypads. You can use a Q-Tip moistened with alcohol to clean anything that has dripped down between the keys.


Please be sure to switch off the Computer unit before carrying out this practice. And don’t touch the PCB board’s with out grounding yourself, this may cause static and damaging the chips.
Tools might need:-

Compress Air Unit

Cleaning Kit

Selasa, 20 Maret 2007

Music Under Water.

NU Dolphine Mp3 Player
Thanks to NU-Global who had made this possible. NU Global had introduced a unique NU Dolphine mp3 player, which can be played underwater.

Now swimmer’s can enjoy music with ease and don’t have to listen to the humming sounds. The waterproof player is designed to be strapped to the side of goggles. The shape it self tells how unique this device can be.
With a cylindrical shape with buttons and earphone jack on the side. To prevent water from seeping into the player, earphone jack is fitted with a special screw-in connector. The earphone is wrapped with a special non-woven fabric membrane to keep the speaker vibration plate dry.

The soft silicon ears fitting fit snugly in the ear to prevent the ear phone from coming loose during swimming.

The capacity of the player is currently at 2Gb, the operating time is roughly 8 hours on a single charge.

Compliant with international IPx7 water resistance standard
Memory size: 128MB/256MB/512MB/1GB/2GB
Audio format: MP3, WMACompliant with Full Speed USB 2.0 specification
Compatible with Win2000/WinME/WinXP and Mac OS 8.6+ and Linux 2.4.0
Non-volatile solid-state storage - data retention for at least 10 years


Water Proof Casings and other Mp3 Player

Kamis, 15 Maret 2007

Manage Open Windows

Windows is about multitasking that gives you the control to use more programs running at the same time. The fastest way to switch among open programs is by "task switching" shortcut.


Hold down the ALT key on your keyboard, and tap the TAB key repeatedly to cycle through the active programs. When you releases the keys, the program that was last highlighted in the task switching windows will become the foreground application.


In the Windows Vista, you will see a preview of the contents of each open application, making it easier for you to switch to the application via a scroll of your mouse.


Terminating Application/Software on Windows.


When a program stop responding or hangs, There’s an easier way to terminate the application quickly with having you rebooting the system.


Hold down the CTRL, ALT and DEL keys simultaneously, on your keyboard and a pop up message will appear as TASK Manager, and then click the Task Manager button to bring up the Windows Task Manager.


Under Application, Locate the program that is not working – it will be identified as "not responding" next to it. Select the application and then click the End Task Button. This application will be terminated.

Senin, 12 Maret 2007

Portable USB power via Battery

Portable USB Charger

A small & simple, yet very powerful USB charger for your mp3 player,
Camera, cell phone, and just about any other gadget that you may plug into a USB port
to get it charge!

The charger circuitry and 2 AA batteries fit into an Altoids gum tin,
And will run your iPod for hours! it needs 2.5x more than you'd get from a 9V USB charger!
You can use rechargeable batteries instead.

Test Results:-
iPod video (tested, using alkaline batteries): Last for 3hrs for video (1 full recharge)
iPod shuffle (not tested): 60 hours or more (5 full recharges)
iPod mini (tested w/rechargeable): 26 hours and more (1.5 full recharges)

Device Compatibility
Turns out some of the devices doesn't like to be charged with a battery pack,
Usually devices that require special drivers for enhanced to charging.

Tested for computability and functions:
Apple iPod: Mini, Nano rev 1G/2G, Shuffle 1G/2G, Photo/5G/Video
Microsoft Zune
Rio Carbon
Nintendo DS/GameBoy Advance
Sony PSP
Samsung T809
iPaq (5555 pocket pc)
Blackberry
PocketPC HX4700 - Go into the power settings and turn on charging with USB. You should enable charging via USB.
HOLUX GPSlim236 bluetooth GPS
Creative Zen Micro (tested with firmware v1.11.01)
MobiBLU DAH-1500i
Treo 700p
Garmin Edge 305
Mrobe 500 + 100
O2 XDA II
iRiver H340
iMate Jam, iMate SP5 smartphone
Palm TX
Dell DJ Ditty

Portable USB Charger
It works well in every situation. Better more I’m gone give it to you for you to assemble it and build your own USB charger on my next blog.

Hang on "ccApp"

Evertime Shutting Down or restarting the computer, Windows will have this error "ccApp" in the holding up process. What does this mean?

We will never understand this cryptic identifier but this error code belongs to Symantec security software. The meaning of ccApp is Common Client Application Frameworks, as is clearer for anyone who doesn’t work with Symantec.

This software comes with other add-ons can sometimes take too long to clock out when you’re restarting or shutting down your computer. When this happen there’s a dialogue reporting that an application is not responding.

You may see the task manager performing the report when you had press ctrl+alt and delete together rather your program running or not responding. Click the END button. And your other software will be running normally.

Rabu, 07 Maret 2007

5 ways to improve your XP O/S

1. Turn Off System Restore

System Restore can be a useful if your computer is having problems, however storing all the restore points can literally take up Gigabytes of space on your hard drive. To turn off System Restore:

a. Open Control Panel
b. Click on Performance and Maintenance
c. Click on System
d. Click on the System Restore tab
e. Tick "Turn off System Restore on All Drives"
f. Click "Ok"

2. Make Your Menus Load Faster
This is one of my favorite tips as it makes a huge difference on how fast your machine will "feel". What this tips does is that removes the slight delay between clicking on a menu and XP displaying the menu.

a. Go to Start then Run
b. Type "Regedit" then click "Ok"
c. Find "HKEY_CURRENT_USER\Control Panel\Desktop"
d. Select "MenuShowDelay"
e. Right click and select "Modify"
f. Reduce the number to around "100"

3.Disable System Sounds
Surprisingly, the beeps that your computer makes for various system sounds can slow down particularly at startup and shut-down. To fix this turn off the system sounds:

a. Open Control Panel
b. Click Sounds and Audio Devices
c. Check Place volume icon in taskbar
d. Click Sounds Tab
e. Choose "No Sounds" for the Sound Scheme
f. Click "No"
g. Click "Apply"
h. Click "OK"
i. Improve Boot Times

4. Improve XP Shutdown Speed
This tips reduces the time XP waits before automatically closing any running programs when you give it the command to shutdown.

a. Go to Start then select Run
b. Type "Regedit" and click ok
c. Find "HKEY_CURRENT_USER\Control Panel\Desktop" Select "WaitToKillAppTimeout"
d. Right click and select "Modify"
e. Change the value to "1000"
f. Click "OK"
g. Now select "HungAppTimeout"
h. Right click and select "Modify"
i. Change the value to "1000"
j. Click "OK"
k. Now find "HKEY_USERS\.DEFAULT\Control Panel\Desktop"
l. Select "WaitToKillAppTimeout"
m. Right click and select "Modify"
n. Change the value to "1000"
o. Click "OK"
p. Now find "HKEY_LOCAL_MACHINE\System\CurrentControlSet\Control"
q. Select "WaitToKillServiceTimeout"
r. Right click and select "Modify"
s. Change the value to "1000"
t. Click "OK"

5. Improve Swapfile Performance
If you have more than 256MB of RAM this tip will improve your computer performance. It will be sure that your PC uses full capacity of memory (faster than the swap file) before it uses the swap file.

a. Go to Start then Run
b. Type "msconfig.exe" then ok
c. Click on the System.ini tab
d. Expand the 386enh tab by clicking on the plus sign
e. Click on new then in the blank box type "ConservativeSwapfileUsage=1"
f. Click OK
g. Restart PC

Other Related Post Accelarate XP

Senin, 05 Maret 2007

5 Way's to accelarate your XP

The outcome of each modification will vary to each PC's. I had focused on the XP OS machine regardless of my experience on the individual setup and trouble shooting. Please do not perform any of this modification if you’re not sure and please back up your system first before attempting to modify the XP OS system.

1. Disable Unnecessary Services that is install in your system.

2. Defragment Your Pagefile(Harddrive)
Keeping your pagefile defragmented can provide a boost performance. One of the best ways of doing this is to create a separate partition on your hard drive just for your page file, so that it won’t get impacted by normal disk usage.

A new feature in Microsoft Windows XP is the ability to do a boot defragment. This places all boot files next to each other on the disk to allow for faster booting. By default this option in enables but on some builds it is not. How to enable this feature:
- Go to Start Menu and Click Run
- Type in “Regedit” then click ok
- Find “HKEY_LOCAL_MACHINE\SOFTWARE\Microsoft\Dfrg\BootOpt imizeFunction”
- Select “Enable” from the list on the right
- Right on it and select “Modify”
- Change the value to “Y to enable”
- Reboot

3. Windows XP has all the utilities and will operate these system along side of your preferred software and it eats a lot of memory and slows down the system. Below is a list of services that can be disabled on most of window XP machines:

- Remote Desktop Help Session Manager (disabled for extra security)
- Remote Procedure Call Locator
- Remote Registry (disabled for extra security)
- Remote Registry Service
- Alerter
- Help and Support - (If you use Windows Help and Support leave this enabled)
- Netmeeting Remote Desktop Sharing (disabled for extra security)
- Portable Media Serial Number
- Human Interface Access Devices
- Computer Browser
- Distributed Link Tracking Client
- Indexing Service
- IPSEC Services
- Server
- SSDP Discovery Service - (Unplug n’ Pray will disable this)
- Workstation
- Clipbook
- Secondary Logon
- Routing & Remote Access (disabled for extra security)
- Telnet
- Fast User Switching
- Messenger
- TCP/IP NetBIOS Helper
- Windows Time
- Wireless Zero Configuration (Do not disable if you use a wireless network)
- Upload Manager
- Universal Plug and Play Device Host

To disable these services:
a. Go to Start and then Run and type “services.msc”
b. Doubleclick on the service you want to change
c. Change the startup type to ‘Disable”

4. Make Programs Load Faster
This small change tends to work for most programs. If your program doesn’t load properly just undo the change. For any program:

- Right-click on the icon/shortcut you use to launch the program
- Select properties
- In the ‘target’ box, add ‘ /prefetch:1′ at the end of the line.
- Click “Ok”

That simple now your program/software’s will load faster.

5. Speedup Folder Access - Disable Last Access Update

If you have a lot of folders and subdirectories on your computer, when you access a directory XP wastes a lot of time updating the time stamp showing the last access time for that directory and for ALL sub directories. To stop XP doing this you need to edit the registry. If you are uncomfortable doing this then please do not attempt it.

a. Go to Start and then Run and type “regedit”
b. Click through the file system until you get to “HKEY_LOCAL_MACHINE\System\CurrentControlSet\Control\FileSystem”
c. Right-click in a blank area of the window on the right and select ‘DWORD Value’
d. Create a new DWORD Value called ‘NtfsDisableLastAccessUpdate’
e. Then Right click on the new value and select ‘Modify’
f. Change the Value Data to ‘1′
g. Click ‘OK’

That all for now. I hope you find these tips useful - you should now see a noticeable speed improvement if you make all of these changes correctly.

Other Related Post Improve XP OS